I was looking for a trick about how to add a downloadable link so that readers can download the content just by clicking on that link. This is very much convenient for the readers of my blog if they can download something (the thing that they want) just by clicking on a downloadable link. While searching over the internet, I have found the solution and I am happy that I am sharing the trick about how to create a downloadable file link and how to add it in the blogger blogpost.
How to Add a Downloadable Link for Image:
Suppose you want to add one download link (through which people will be able to download file) in your Blogger blog post or in a post in your website and to do so you will have to follow the below steps:
1. At first Sign in to your Google Drive account. If you do not have any Google Drive account, you can just create one with your Gmail user name and password, not a big deal.
Get a Free PR8 Backlink from Google Drive! Follow the Easy Steps!
2. Now, you can create one account with a suitable name in which you will upload your desired file from your computer which will be downloaded by the users later.
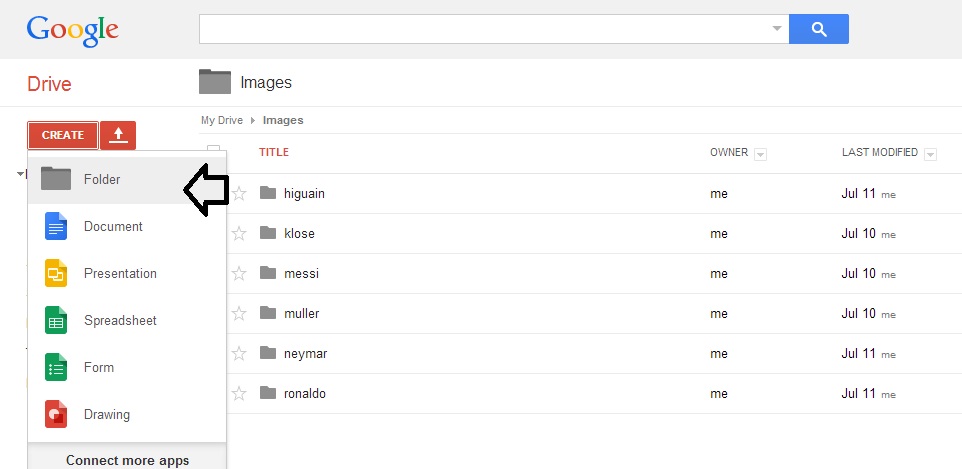
3. After creating the folder with a suitable name, click on the name of the folder and enter into the folder. Now, use the red upload button just beside the “Create” button to upload files. When the file gets uploaded, right click on the file and you will get one option named “Share”. Click on it and you will get the window like below:
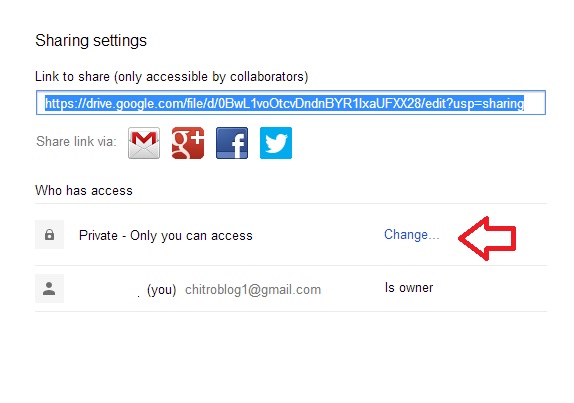
From the above picture, you can see one red arrow which I have marked for you. You will have to change the privacy setting from “Private” to “Public” and need to save the setting.

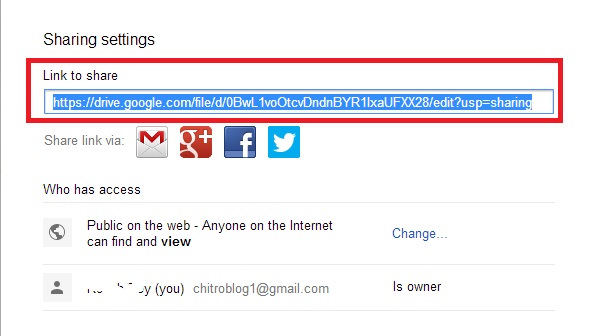
4. After saving, copy the link which is just under “Link to Share”. For my case the link is like below:
Link 1:
https://drive.google.com/file/d/0BwL1voOtcvDndnBYR1lxaUFXX28/edit?usp=sharing
Now to create the direct download link, you will have to use the link below:
Link2:
https://docs.google.com/uc?export=download&id=CopyTheGreenPartFromPreviousURL
Note: You will have to replace the “Red Part” of the Link2 with the “Green Part” of the Link1. This means that you will have to copy the things just after the d/ from Link1 and will have to paste it after id= in Link2. So, for my case the download link is like below:
https://docs.google.com/uc?export=download&id=0BwL1voOtcvDndnBYR1lxaUFXX28
P.S. If you face any problem to create the second link, you can just go to this site and copy and paste the link1 and can generate the link2 automatically.
For my case, I have uploaded one JPG image of my blog header and I am going to create one download link for that. The download link is below:
Download TechnTechie Header File !!
Just by clicking on the above link, you should be able to download my blog header file. The steps are easy and simple. If you still face any problem, you can ask me through comments and I am ready to help you. Now, you know how to add a downloadable link for image. If you like the article, please do not forget to share it with your friends.